Labels

Showing posts with label DIY. Show all posts

Wednesday, January 1, 2014

Starting a Homestead

We started moving out to my in-law's house in September.  It has been a slow process of getting the new place ready, moving, working on things at our old house, having major family events, getting settled, and having a baby!

We want our new place to be more than just a house and a home for our family;  we are also working on homesteading.  We want our family to live healthy lives.  We want our kids to have responsibilities with animals, to be familiar with different animals, to grow and eat foods so they can see where they come from, and to know how to make things instead of just going to the store and buying them.

We know we won't be able to do all this perfectly at first... But it will be a learning experience for all of us.


v. 1 the act of transforming a home into a property that produces some or all of its residents own food and other subsistence needs.
v. 2 participation in home-based activities such as gardening, raising poultry or small livestock, producing simple products through cottage industry, minimizing consumer purchases, and generally seeking ways to increase self-sufficiency within the home environment.
v. 3 the creation of an homestead with the goal of reducing one’s environmental impact and returning to a home-based, family-centered, self-sufficient way of life.


So a couple of weeks before Christmas we got ourselves some goats!  We purchased three milking goats and brought two of them home from Commerce Ga on December 15th and we will be getting the third in February after she has her babies.  We have been cleaning up our shrubbery and trees, burning our burn piles, building fences, starting composting, clearing out barns and cleaning up spaces for a chicken coop.

---------------------------------------------------------------

Our Goats


              Riding home with four 'kids' in the car!


Noel                                                                            Holly - She is the smaller one


They are chillin in their house to stay out of the drizzly rain


Second day feeding the goats


 ---------------------------------------------------
Other homesteading projects

Yay for compost!
     

  We are converting our old greenhouse into a chicken coop that leads outside.  They will be able to roam around in a large space behind the barn as well.


We will be starting on planting in the upcoming months to have plenty of fresh veggies throughout the year.


Tuesday, October 16, 2012

Potato Head Quiet Book

While I was exploring the internet for different ideas for quiet books, I came across a felt Mr Potato Head called My Spud Bud advertised on Etsy.  It looked super cute and I thought to myself... "I can do that!"  Most of Olivia's and Alle's toys beep, talk, or make some kind of noise and I though this would be a fun and quiet thing to play with.  My best friend moved to Japan last week and she has a little girl who just turned two so I decided to make this for 'baby Daisy' as a birthday present thinking it will be fun for her to play with on the plane ride as well.  For some reason I always like to try out new things on other people... new brownie recipe, cooking macaroni and cheese in milk (did not turn out very good!)... so why not this too!

It took a lot longer than I had planned but I think it turned out pretty good!


It opens and there is a pocket on the left hand side with all of the pieces in it.  The body of the potato head is hand sewn on the right side.  There are eyes, mouths, teeth, noses, mustache, glasses, ears, and shoes.


I sewed on Velcro to keep the book closes and also to close the pocket

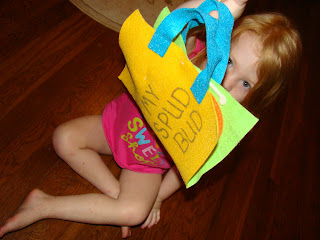
Olivia wanted to slow off the book by holding in front of her face!


I think it turned out pretty good.  Olivia wanted me to make her one so I did but it is a little bit different.  I sewed her potato head onto felt but then put that onto regular fabric for the cover and handles.


Here is the center and the pieces that I made for hers

Having fun with making some potatoes.


Friday, June 1, 2012

Custom Bleached Shirts

We are planning on working on different fun projects throughout the summer and this week we made custom bleached shirts for Olivia.

What you need:
-A shirt
-Freezer paper
-Bleach
-Spray bottle or water gun
-Cardboard
-Bucket or something to put the shirt in and get wet
-Rubber gloves (optional)

We couldn't find any plain colored shirts in her size so we got two tank tops from walmart.

1.  Draw on the wax paper what you want on your shirt... letters, shapes, designs.  Then you put them on your shirt wax side down.  What is under the wax paper will remain the color of the shirt and what is sprayed with the bleach will turn a lighter color.

2. Iron the wax paper onto your shirt (wax side down).  Make sure your iron is on medium heat and the steam is not on.  Iron for a couple of minutes until the wax paper is stuck all around the edges.


3.  Put a piece of cardboard inside your shirt so the bleach wont bleed through

4.  Fill your spray bottle or water gun with bleach.  You can cut the bleach with some water if you would like.

5.  Now spray your shirt!  Make sure you are not spaying into the wind or dripping the bleach onto your self.  The shirt will look better in only a portion of your shirt is sprayed instead of the entire thing and it also looks different if you spray a light mist or if you drip a lot of the bleach in one spot.

6.  It took several minutes before I could tell the bleached portion of the shirt turning.  And I left the bleach on the pink shirt for about 15 minutes.  It may just depend on what kind of shirt it is.


7.  When the shirt gets to the color you want it then put it into some water and swish it around.  The paper will probably start to peel off.  I went ahead and took all the freezer paper off at this point.

8.  After rinsing off your shirt put it into the washer machine before wearing.


I think they turned out pretty well.  The pink one does not look as good and the letters bled through.  I'm not sure if that was because I didn't iron them on as well or because I left the bleach on too long... or both.

The next day I found a brown shirt from Olivia's room and traced an elephant onto the wax paper.  I really like how this one turning out.  It started turning colors almost immediately after we sprayed the bleach.  It could have been because of the color of the shirt or maybe because we were out int he middle of the day and the sun was hot!  Either way I like it a lot!


Saturday, May 19, 2012

Friday Fav: Homemade Play Dough

Olivia is having her 3rd birthday party tomorrow and the theme is Olivia the Pig.  If you have never heard of Olivia the Pig you need to check it out.  It is a TV show that comes on Nick Jr.  Olivia the Pig's favorite color is RED.  Anything she can have red, she does!  We are going to try to have as much red as possible at Olivia's birthday party.  So for the party favors at the birthday party I decided to make red play dough.

I went off the recipe on this blog, and this blog, and this video.  Most of the recipes I found called for Cream of Tarter.  I looked at Winn Dixie and Walmart and could not find it at either place!  After watching the video and reading the blog I scrolled down to read all of the comments.  Some people said that they replaced the Cream of Tarter with Lemon Juice and one person even said they added a little Vinegar to help slow bacteria growth.  I used these two suggestions but there were also others suggestions such as using Kool-aid packets to color and different extracts to scent.  I really wanted to add glitter but I couldn't find what I needed at Walmart.

These are the ingredients I ended up using:

2 cups all purpose flour
2 cups water
1 cup non-iodized salt
2 tbsp vegetable oil
1 tbsp lemon juice
1 splash vinegar
1 splash vanilla extract
red food coloring

Put all of the ingredients into a medium or large sauce pan on the stove and used a whisk to mix them together.  Turn the stove on medium heat and use a wooden spoon to stir constantly.  After about 2 or 3 minutes the spoon will start to scrape some thickness up from the bottom of the pan.  Keep stirring making sure you scrape the bottom on the pan each time.

(The color looks a little different because the flash was used on some of the pics)


Your mixture will get thicker and thicker.  Just keep stirring.  Eventually all of the liquid will turn to a thick goo.  When this happens, take it off the stove and let cool for a couple of minute.


When the mixture cooled slightly scrapped it onto some plastic wrap onto the counter.  While it is still hot, fold and need it a few times.  This will help the texture become more like play dough.  I then separated it out into nine small balls, but you can keep it in one large lump.  You can also cut this recipe in half or wait until the end to add your color so you can have more variety in colors.


It was pretty easy and fun to make.  I took the balls and put them in zip lock baggies so I can give them away as party favors at Olivia's party.  Have fun with making this homemade play dough!